IA Modules eCommerce Documentation
Things to Know and Add to Quickbooks
Before setting up the store options, there may be a few things you want to add to QuickBooks and synch up to the store. You can add or change these after the installation and initial setup by returning to the setup screen anytime. We have provided detailed instructions below.
Sales Rep - add a sales rep to QuickBooks for each storefront you will have. this will allow it to mark all new customers with that rep, and their orders with that rep.
Class (see enabling classes) - add a class. if you are doing multiple storefronts, add a class for each one named appropriately. this will help you when you want to break down sales that came from one storefront from another storefront or channel like phone, fax, or whatever.
Tax Codes - you should have tax codes. typically, at least one for out of state which would be 0% and one for instate that woudl be some typical % rate. This will allow the store to set new customers with the right tax code, saving you time and to help collect the right tax amounts.
Shipping Item - make sure you have one item of the qb item type: Other Item Type for shipping purposes. you will need to specify one item for the shipping calculator to add to orders and set with the calculated charges.
How to use QuickBooks
1. Always open QB on file using same folder path to your QBW file
2. Always open QB using multi user mode or our synch program will not be able to communicate with QuickBooks.
3. Only then can you run the synch program via Start / Programs / IAM Server Suite / Start IAM Server.
Single user vs Multi user mode- how to tell, how to switch?
| multi user mode | allows up to 5-10 people to connect to the QB file. it is required for the IAM server to work |
| strong>s |
allows only one person to connect to QB file |
In order to switch user modes click on the "file" menu
You know you are on Mutli-user mode if the top of your screen looks like this:

You know you are on Single-user mode if the top of your screen looks like this :
![]()
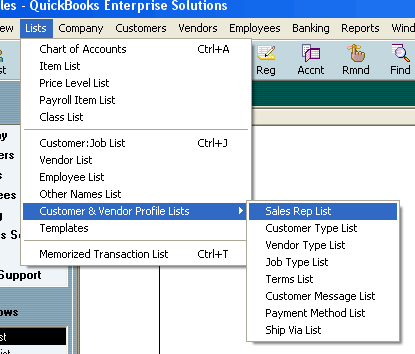
How Do You Create a Sales Rep?
Create a Sales Rep simply by clicking List then Customer & Vendor Profile Lists then Sales Rep List see below
At the Sales Rep List click Sales Rep then New see below
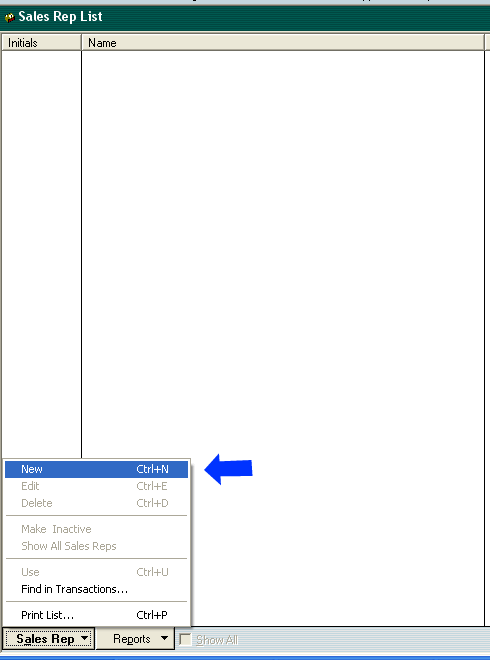
You have just created a Sales Rep. Now you must Enable Class Tracking.
How To Enable Class Tracking?
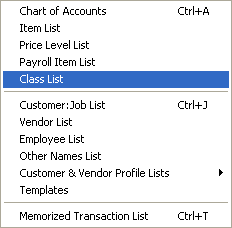
Go to List and find class list (normally below where the payroll item list is:
If it is missing like in the image below we have to enable it.
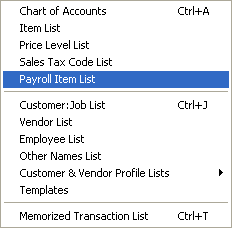
If you do not see class list
GO TO SINGLE USER MODE
Go to Edit and then Preferences; See below
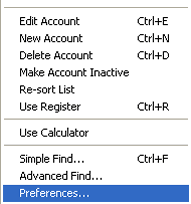
On the next screen click: company preferences tab
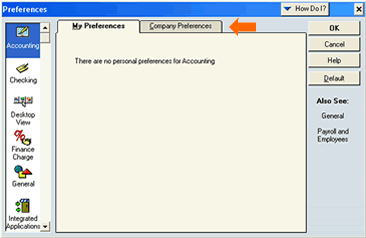
On the company preferences tab: check use class tracking.
You can also choose Prompt to assign classes. This enables prompting to QB users whenever an order or item on an order has not been assigned a class. This can be annoying but will force your users to fill in complete information making your reports much better. It is up to you.
![]()
You just enabled class tracking! Now you must create a class for the store to use.
How to Create a Class?
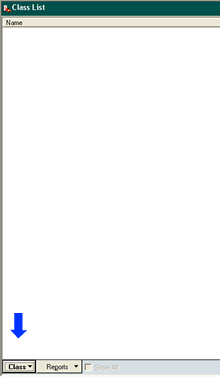
Creating a Class is simple: Go to List then class list
click name to add a new class
Type the class name like ('Web ' ) and press OK

3 Items you should have or Add
| 1. | In state sales tax |
| 2. | Out of state sales tax |
| 3. | Shipping |
Go to Item